New to Sendit!? Start with Getting started with Sendit!. Login: sendit.texo.co.za.
Contents
- Overview & terminology
- Brands & settings
- Lists & subscribers
- Subscribe forms & opt-in
- Custom fields
- List segmentation
- Email templates & drag-and-drop editor
- AI Assistant
- Campaigns — create, test & send
- Autoresponders (drip emails)
- Reports & analytics
- Bounces, complaints & housekeeping
- Rules & webhooks
- Deliverability best practices
- Plans, quotas & attachments
1. Overview & terminology
Sendit! is Texo’s fully managed newsletter and bulk-email platform. The login page shows SENDIT! with Texo. Throughout this guide, menu labels refer to what you see in Sendit!.
| Term | Meaning |
|---|---|
| Brand | Top-level workspace — one business, product or client |
| List | A collection of subscriber email addresses |
| Campaign | A one-off newsletter or announcement sent to a list or segment |
| Autoresponder | Automated email (or series) triggered when someone subscribes |
| Segment | A filtered subset of a list (e.g. by country, custom field or engagement) |
| Template | Reusable HTML email design |
2. Brands & settings
Switch brands from the main menu. Each brand has its own lists, campaigns, templates and reports.
Brand settings
Open Settings inside a brand to configure:
- From name / From email / Reply-to — defaults for campaigns
- Custom domain — optional subdomain (e.g.
newsletter.yourdomain.com) so unsubscribe, web-version and tracked links use your domain; see getting started for DNS - Logo — shown on subscribe forms and some system emails
- GDPR options — for EU subscribers (re-consent, data export)
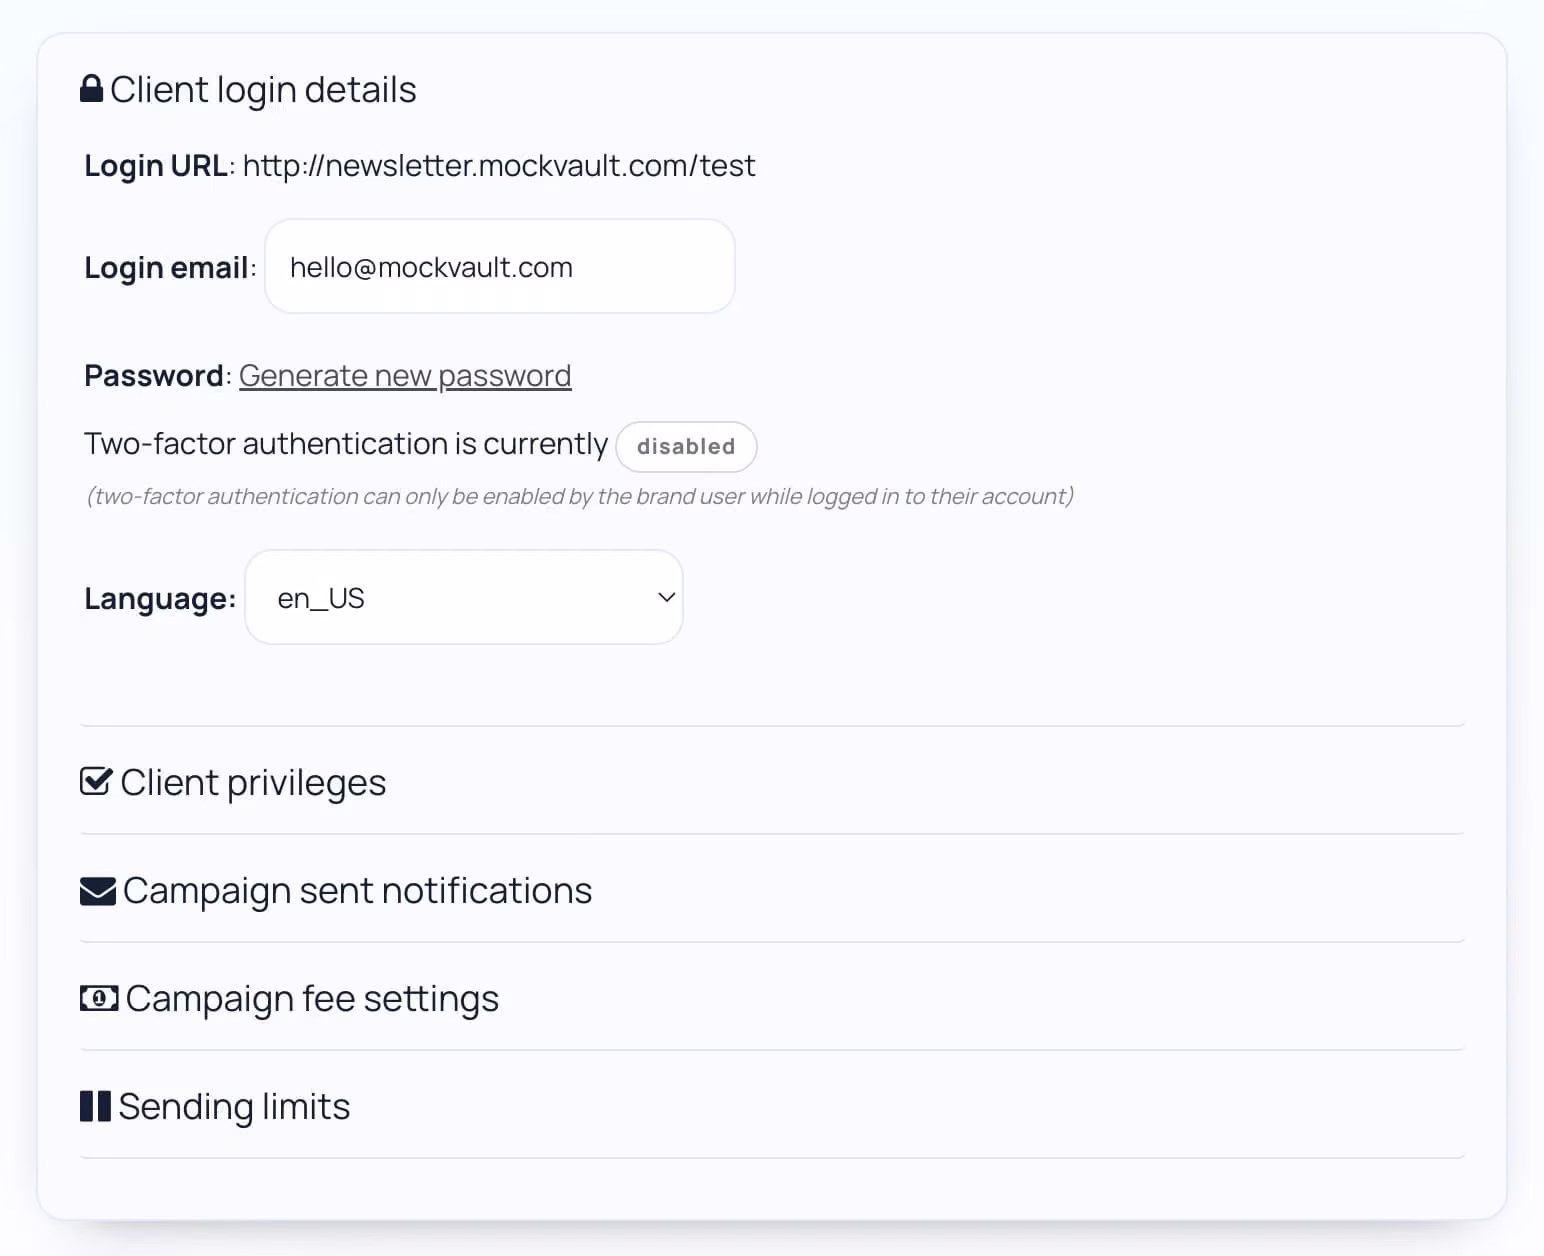
- Client access — create separate logins for clients with limited privileges (agencies)
Agencies can set per-brand monthly send limits and cost-per-email when handing logins to clients.

Custom domains help recipients recognise your brand in unsubscribe and tracking links, which can lower complaint rates.
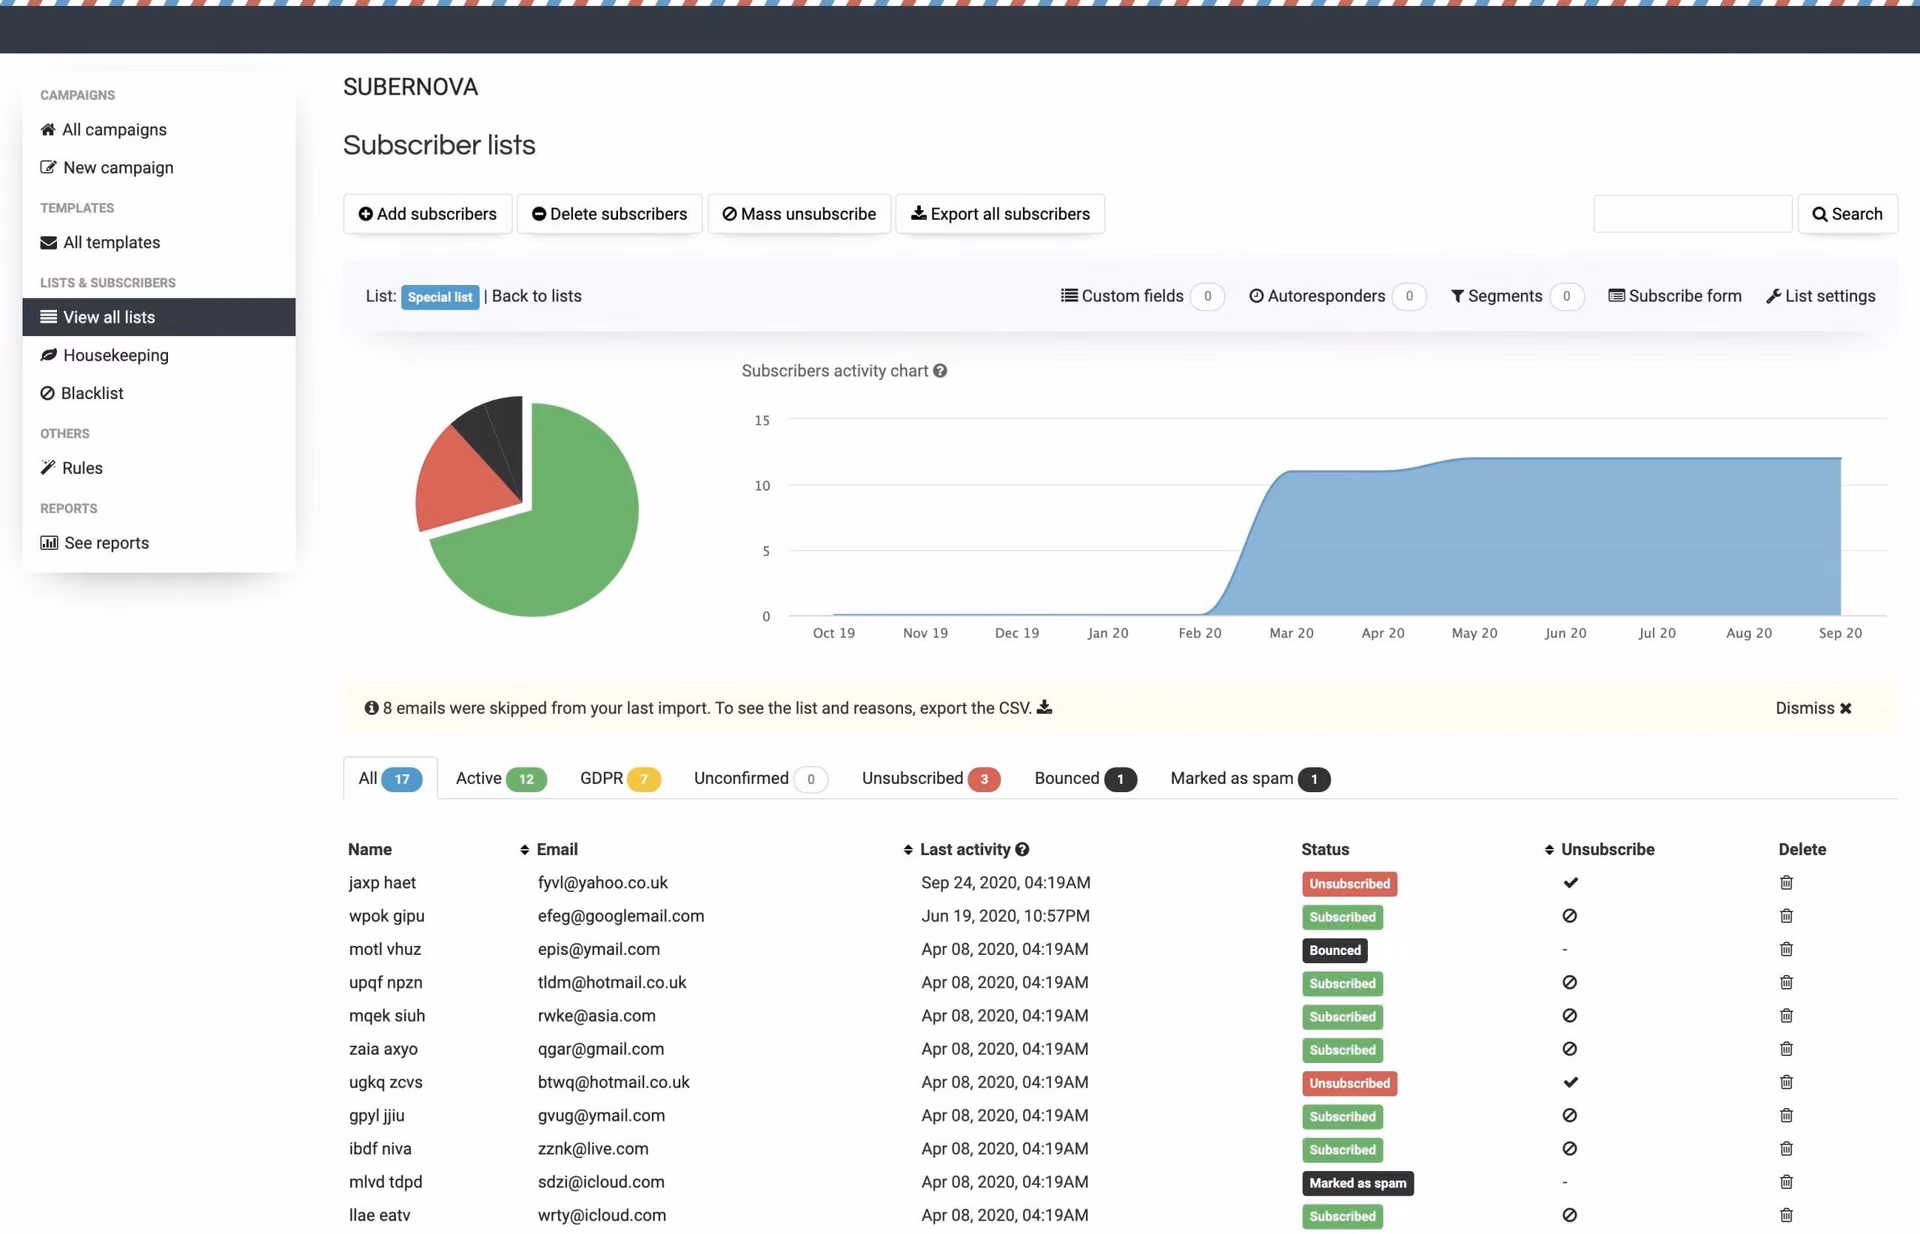
3. Lists & subscribers
Create a list
View all lists → Add a new list. Name it clearly. Choose:
- Single opt-in — subscriber is active immediately after signing up
- Double opt-in — subscriber must click a confirmation link (recommended for marketing lists)
Add subscribers
- Single subscriber — paste one email at a time
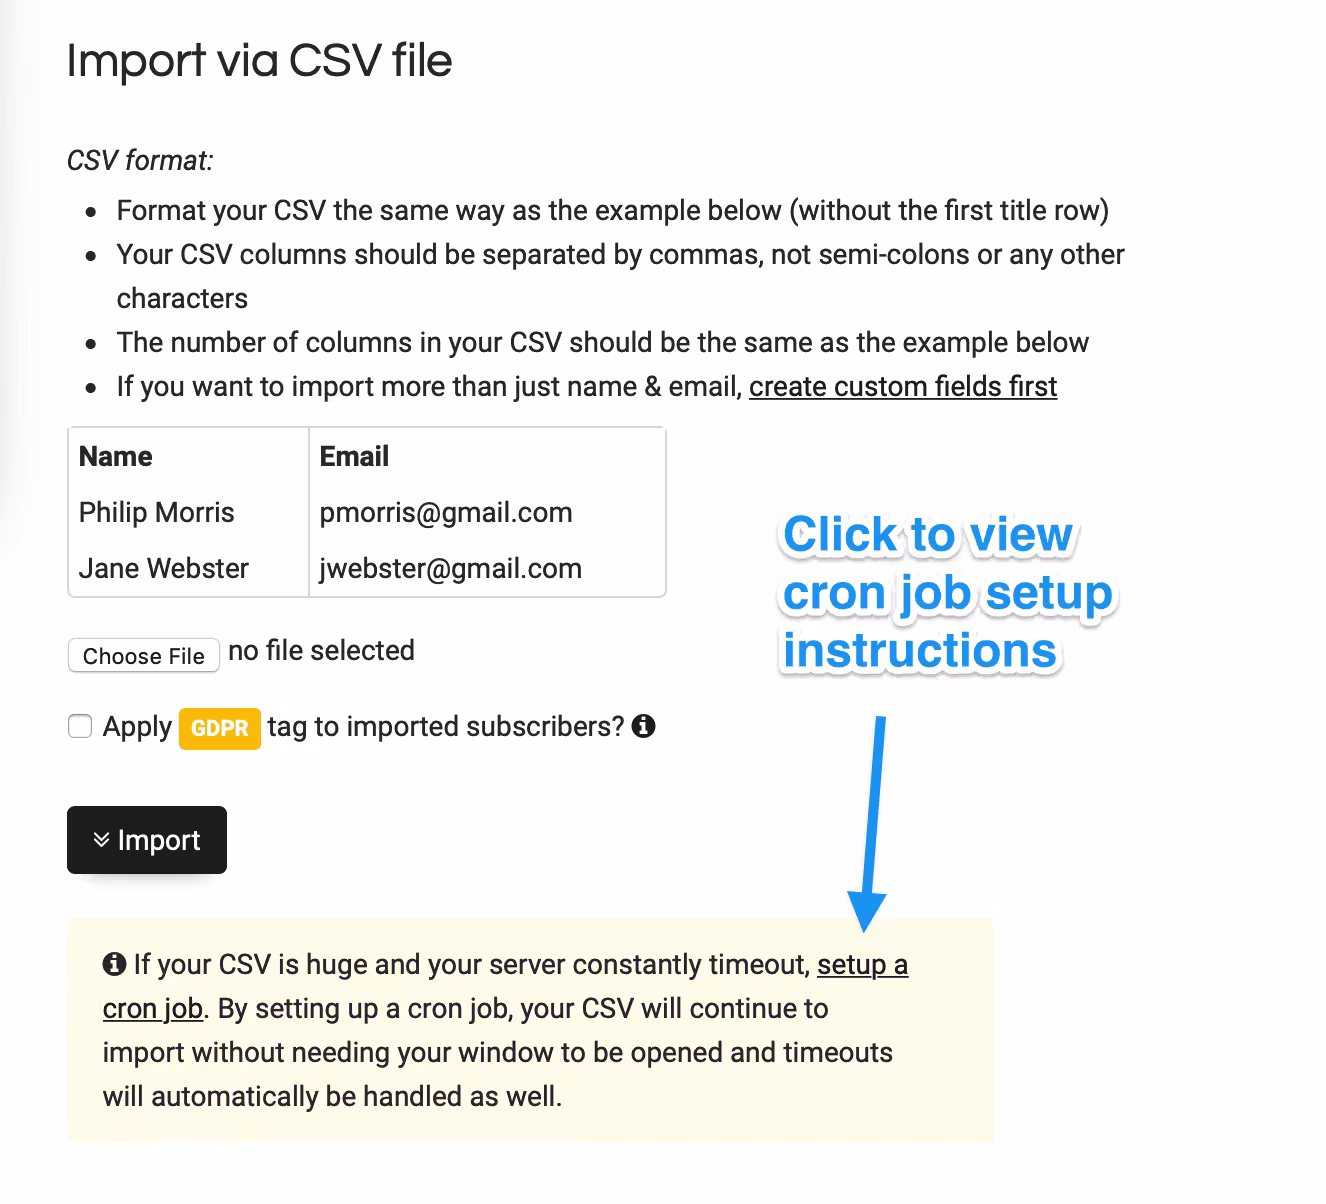
- Import CSV — bulk upload (columns: email required; name and custom fields optional)
- Subscribe form — embed on your site (see below)
CSV import tips
- Use UTF-8 encoding; first row = column headers
- Large files import in the background — progress shows on the list
- Split very large files (100k+ rows) into smaller CSVs if import stalls
- Duplicate emails in the same list are skipped or updated depending on options
Export subscribers
From a list, use Export to download active, unsubscribed or all subscribers as CSV — useful for backups or moving data.
Suppressions & blacklists
Import a suppression list to block specific addresses from receiving mail across the brand. Useful after migrating from another platform.
4. Subscribe forms & opt-in
Each list has a ready-made HTML subscribe form: View all lists → select list → Subscribe form.
- Copy the embed code into your website or landing page
- Forms support custom fields, GDPR checkbox and honeypot anti-spam
- Style with your own CSS — the form markup is simple HTML
POPIA / GDPR: Collect consent explicitly. Link to your privacy policy. Do not pre-tick marketing checkboxes.
5. Custom fields
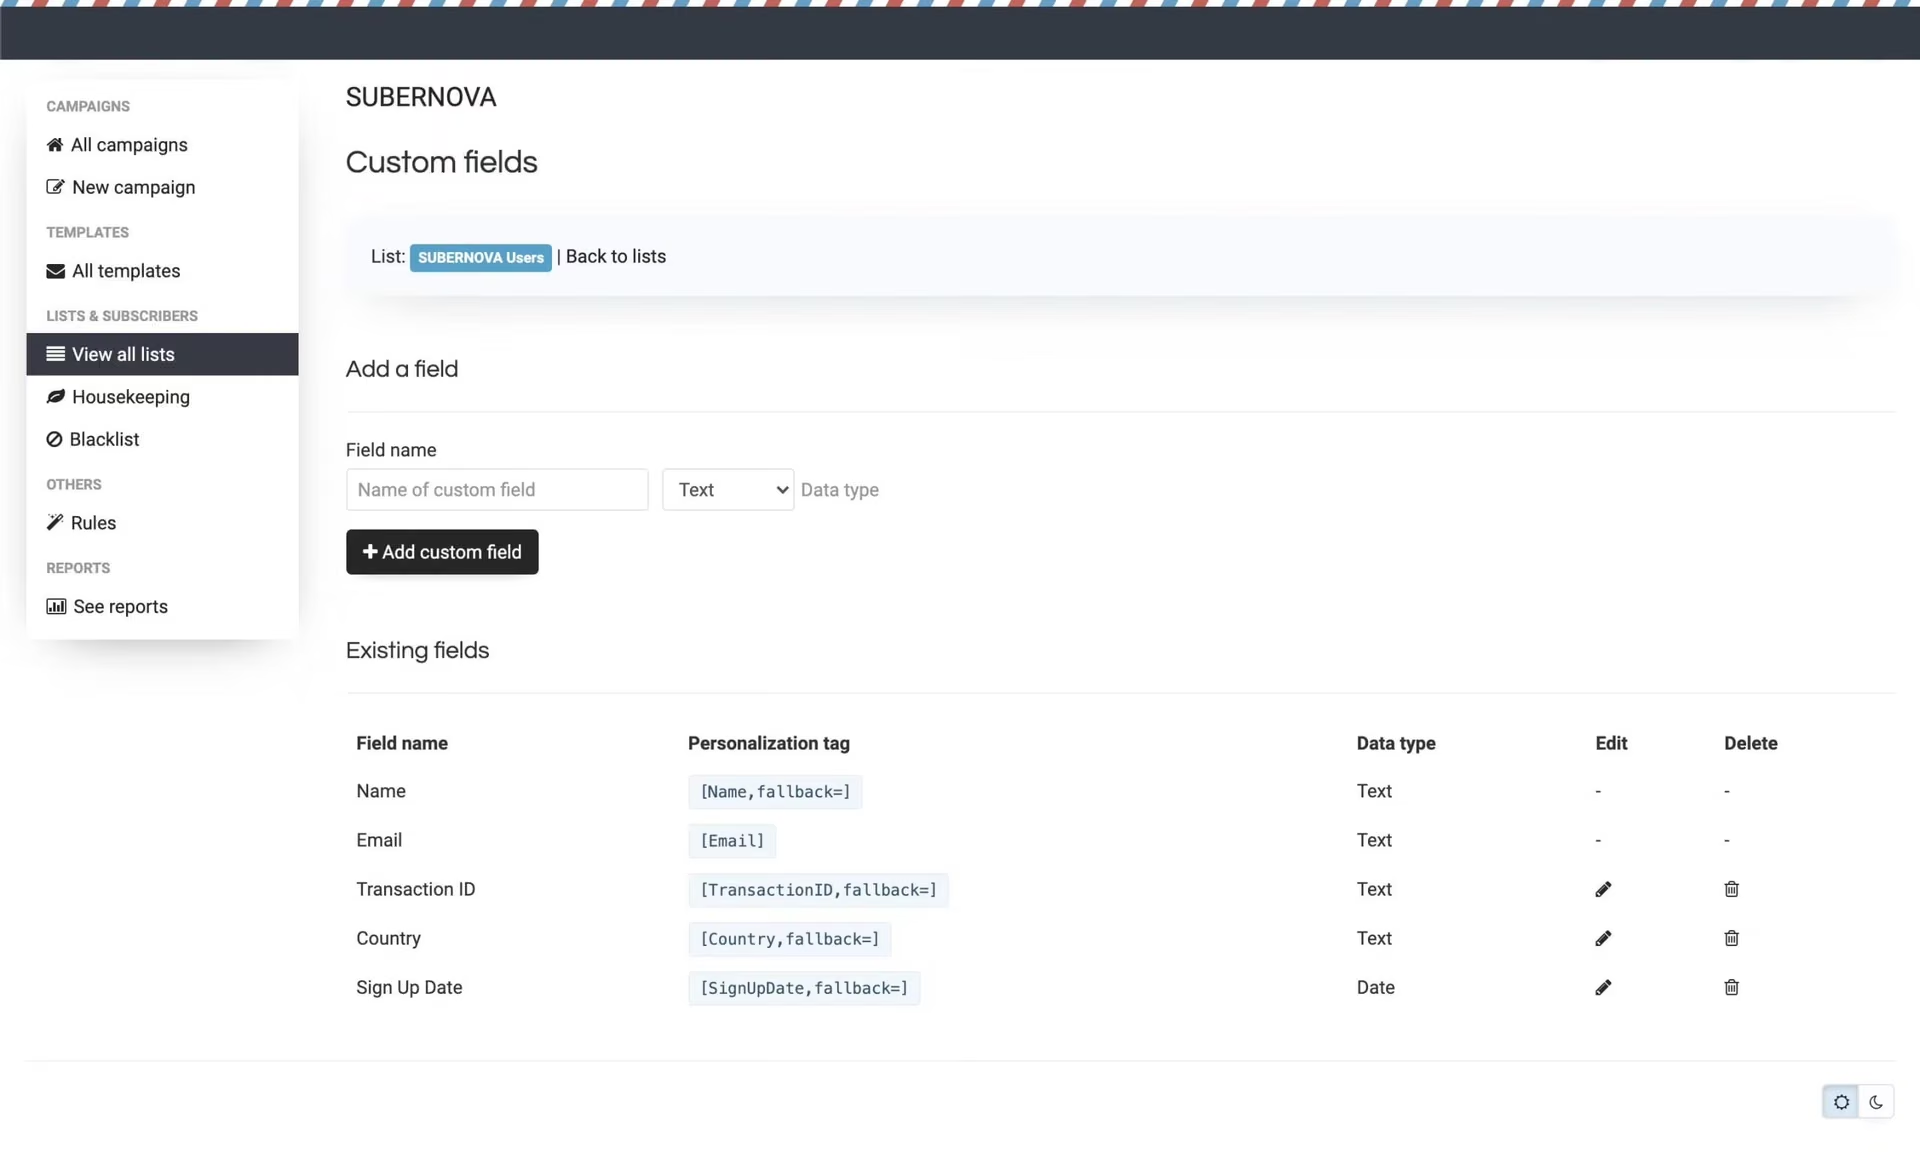
Store extra data per subscriber — first name, company, birthday, preferences, etc.
- Custom fields in the brand menu → add fields (text, date, etc.)
- Each field gets a personalisation tag like
[First name,fallback=there]for use in campaigns - Include field columns in CSV imports or pass via the subscribe API
Use personalisation tags in subject lines and body copy to improve engagement.
6. List segmentation
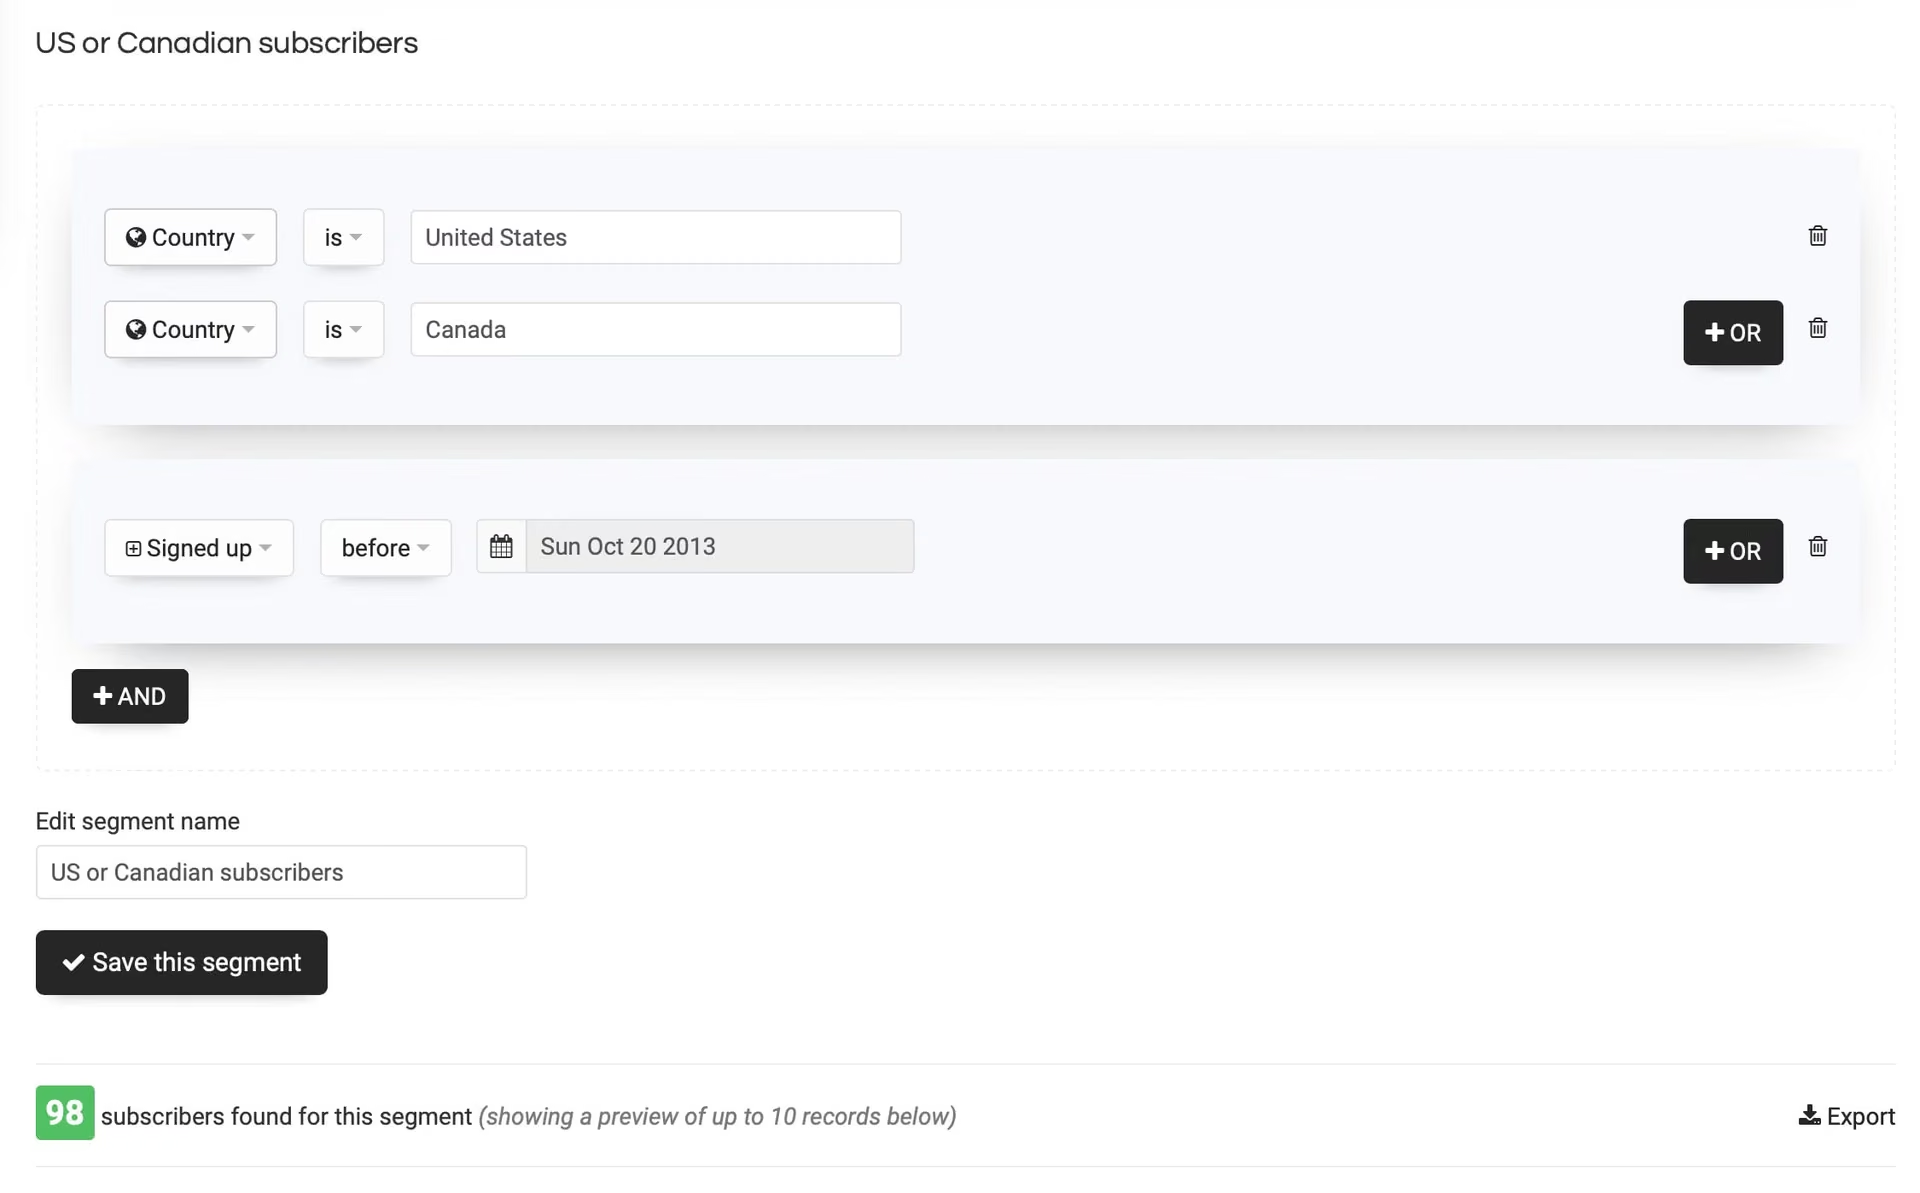
Segments let you target part of a list instead of blasting everyone.
Examples:
- Country = South Africa
- Custom field “Plan” = Pro
- Opened last campaign
- Did not click any link in the last 90 days
Create segments under a list → Segments. When sending a campaign, choose list(s) and/or segment(s), and optionally exclude segments (e.g. “exclude unsubscribed” is automatic).
7. Email templates & drag-and-drop editor
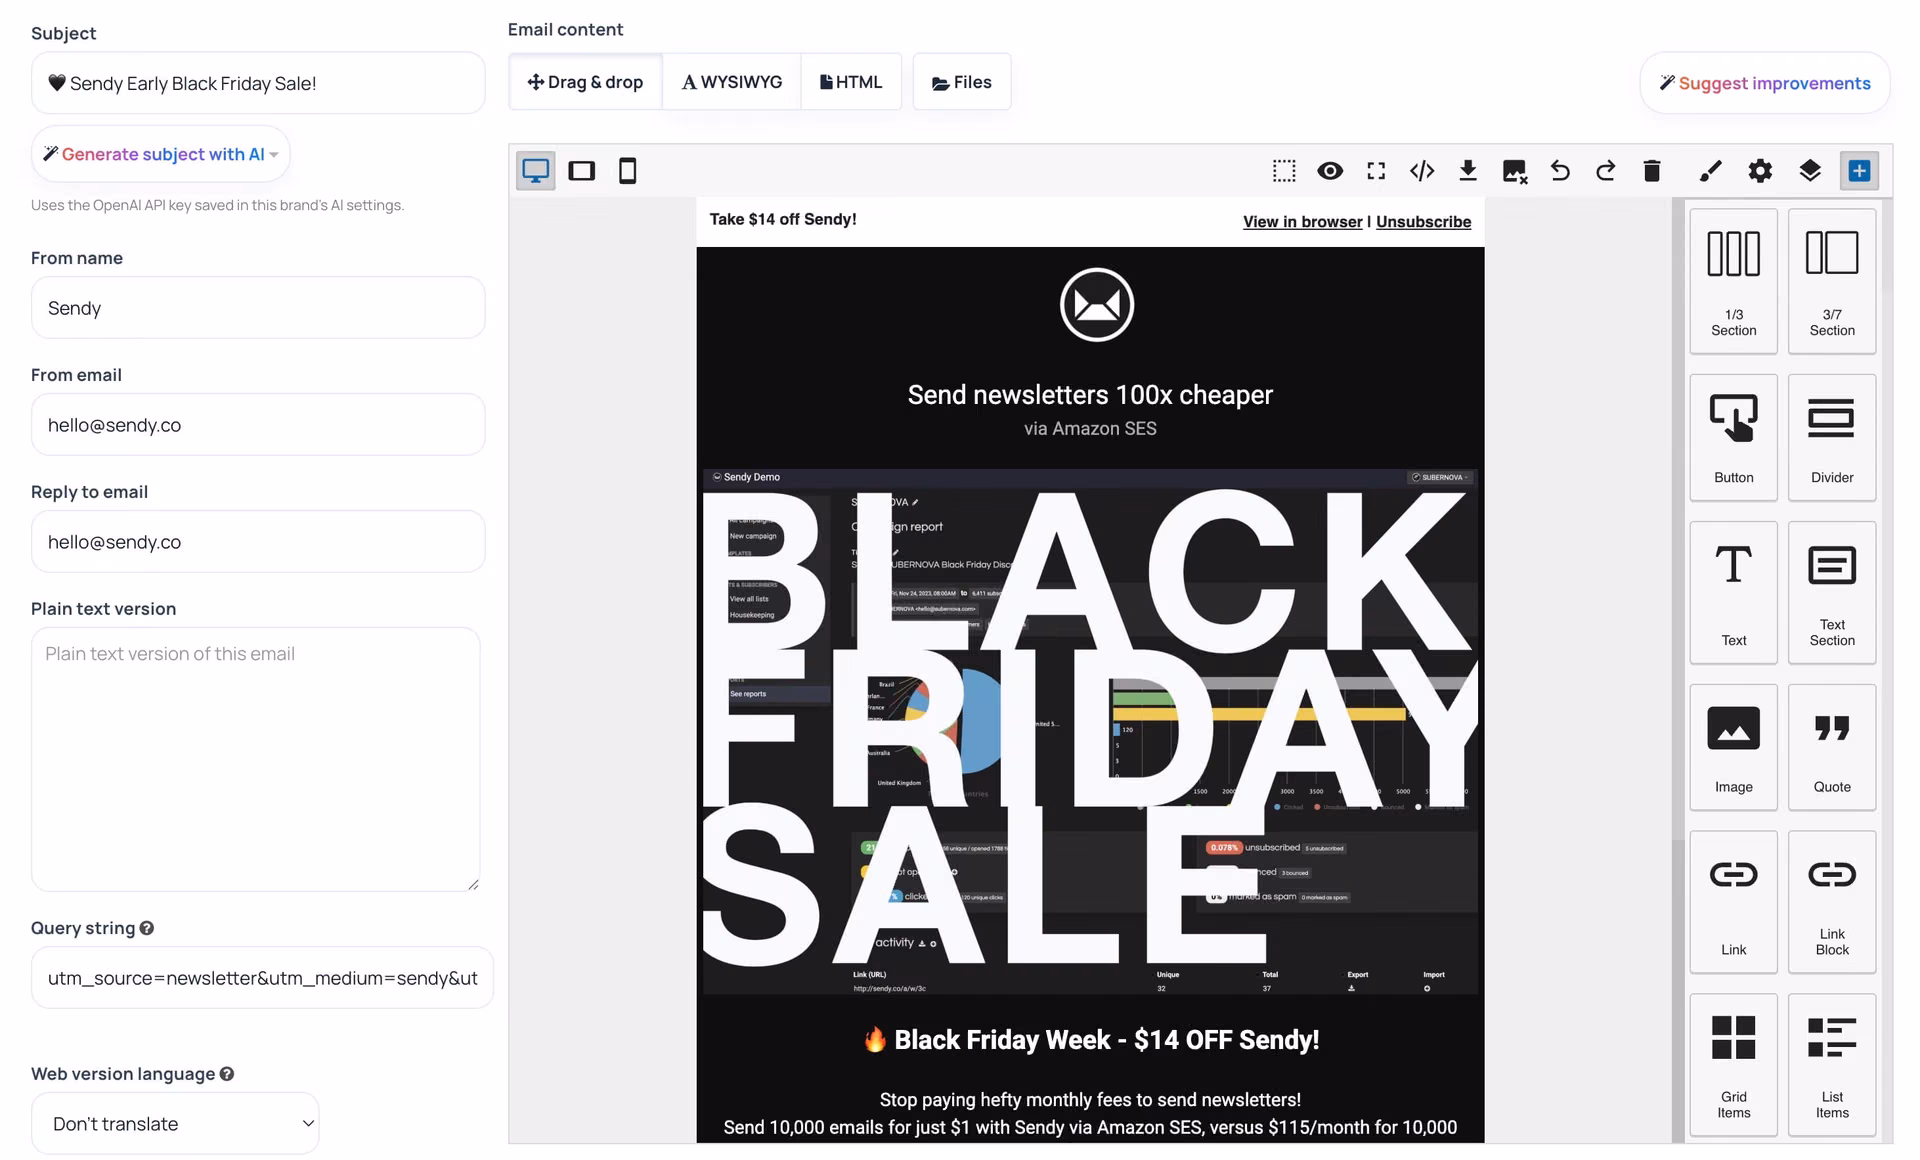
View all templates stores reusable designs.
- Design emails visually with the drag-and-drop editor — no coding required
- Switch between Drag & Drop, WYSIWYG and HTML editors when building a template
- Paste exported HTML from Mail Designer, Beefree, etc. if you prefer
- Always include a plain-text version — campaigns perform better and spam filters prefer it
- Use
[unsubscribe]and[webversion]tags — required for compliance - Test with real content and images before sending to thousands
8. AI Assistant
Sendit! includes an optional AI Assistant to help you create and improve newsletters faster:
- Generate complete HTML emails from a short brief
- AI subject lines — suggestions to improve open rates
- Review and improve existing email content before sending
- Campaign insights — turn report data into clear, actionable takeaways
Look for AI options when creating templates, drafting campaigns or viewing reports. You can accept, edit or ignore any AI suggestion — always review before sending to your list.
Setting up AI (OpenAI API key)
Sendit!’s AI features require an OpenAI API key. You bring your own key, so usage is billed directly by OpenAI at wholesale rates — not inflated “AI credits” through a middleman.
1. Create or sign in to OpenAI
- New to OpenAI? Create an account
- Already have an account? Sign in
After logging in, open the OpenAI Platform dashboard.
2. Create an API key
- Open the API keys page (also under API keys in the dashboard menu).
- Click Create new secret key.
- Give the key a recognisable name — e.g. Sendit! or the brand that will use it. If OpenAI asks you to choose a project, pick the project you want Sendit! usage billed under.
- Create the key, then copy it immediately. OpenAI only shows the full secret key once. If you close the window before copying it, delete that key and create a new one.
3. Add billing credit
Make sure your OpenAI account has billing set up and add at least $5 to your credit balance. That goes an extremely long way — during testing of Sendit!’s AI features, generating tons of templates, analysis and reports barely used even $1 worth of credits.
4. Send your key to Texo
Once you have your API key, submit a support ticket and send it to us securely. We’ll add it to your Sendit! profile so AI is ready to use.
Do not post your API key in public forums, email footers or website comments. Treat it like a password.
9. Campaigns — create, test & send
Create a campaign
- Create a new campaign (or create & send)
- Enter campaign title (internal), subject line, from/reply details
- Choose HTML template or paste HTML; add plain text
- Define recipients — pick lists and/or segments; exclude if needed
- Optional: schedule send, track opens/clicks, add Google Analytics query string
- Send test email — always do this
- Send now or schedule
While sending
Large campaigns send in batches. Progress appears on the campaign screen. Do not send duplicate campaigns to the same list while one is still sending.
Drafts & duplication
Save drafts to finish later. Duplicate a past campaign to reuse layout for a new edition.
10. Autoresponders (drip emails)
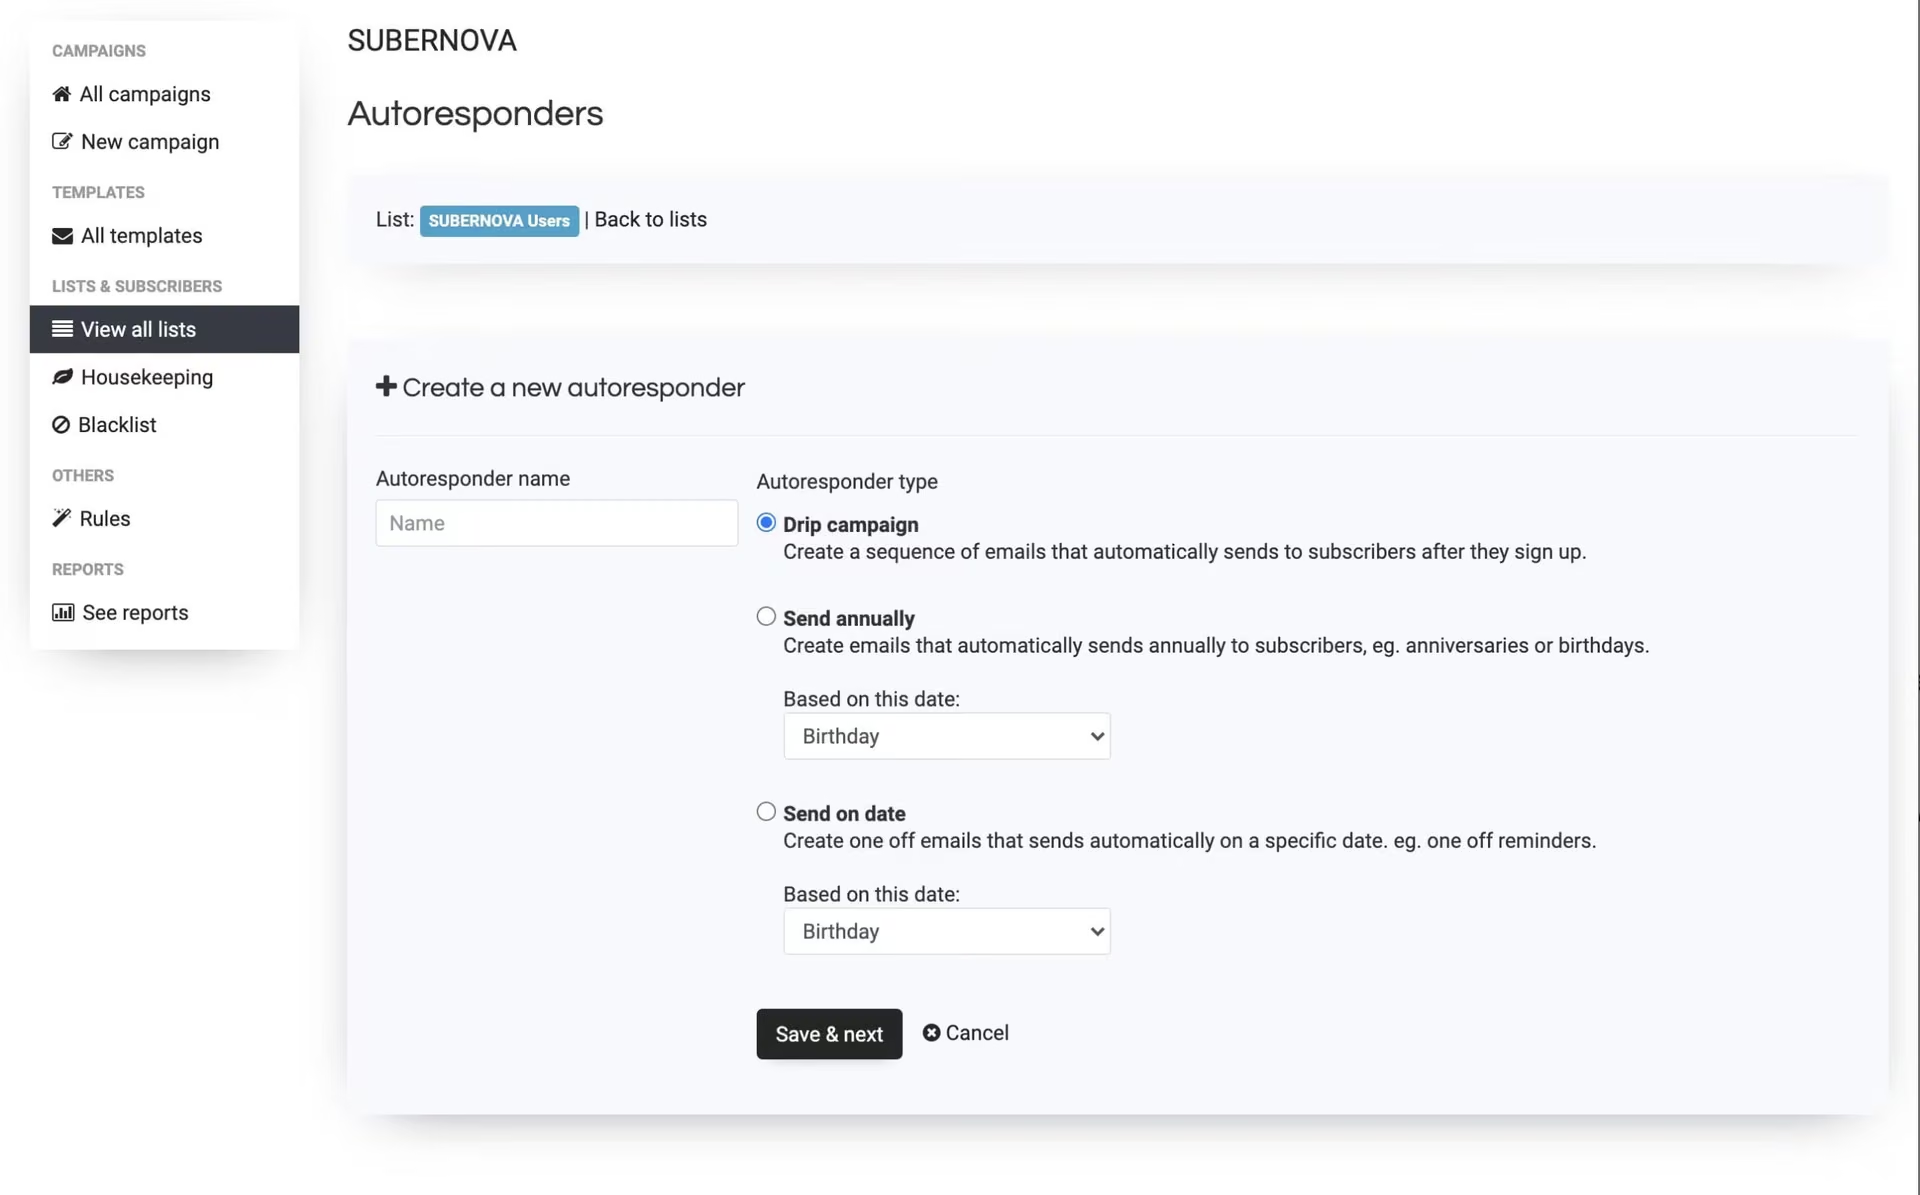
Autoresponders send automatically when someone joins a list — welcome emails, onboarding sequences, lead magnets.
- Autoresponders → Add a new autoresponder
- Choose trigger list and delay (immediately, 1 day later, etc.)
- Write HTML + plain text like a normal campaign
- Chain multiple autoresponders for a drip sequence (day 0, day 3, day 7…)
Only new subscribers after activation receive the sequence — not existing list members (unless you use rules — advanced).
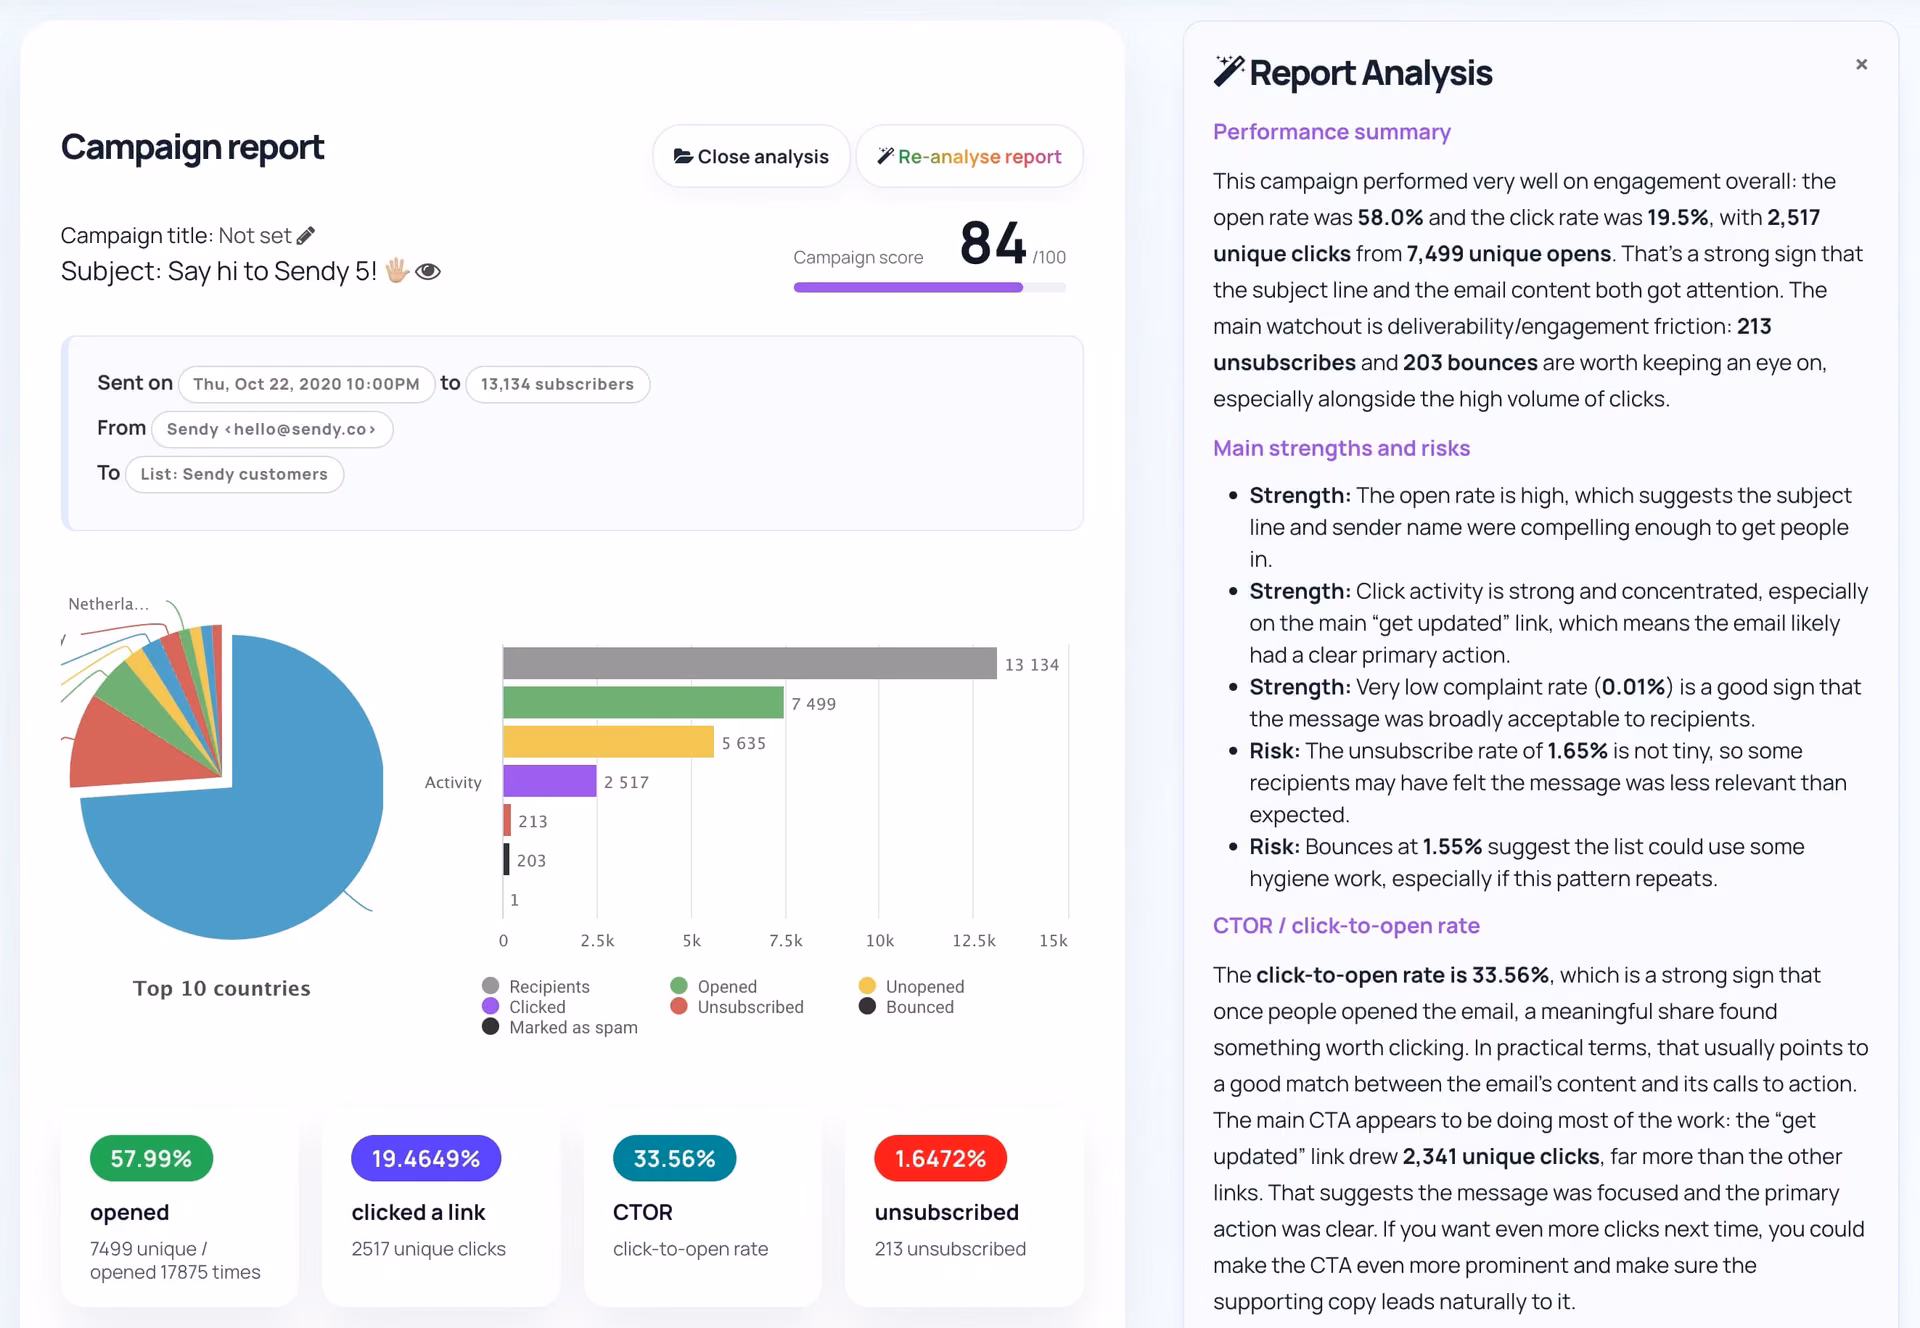
11. Reports & analytics
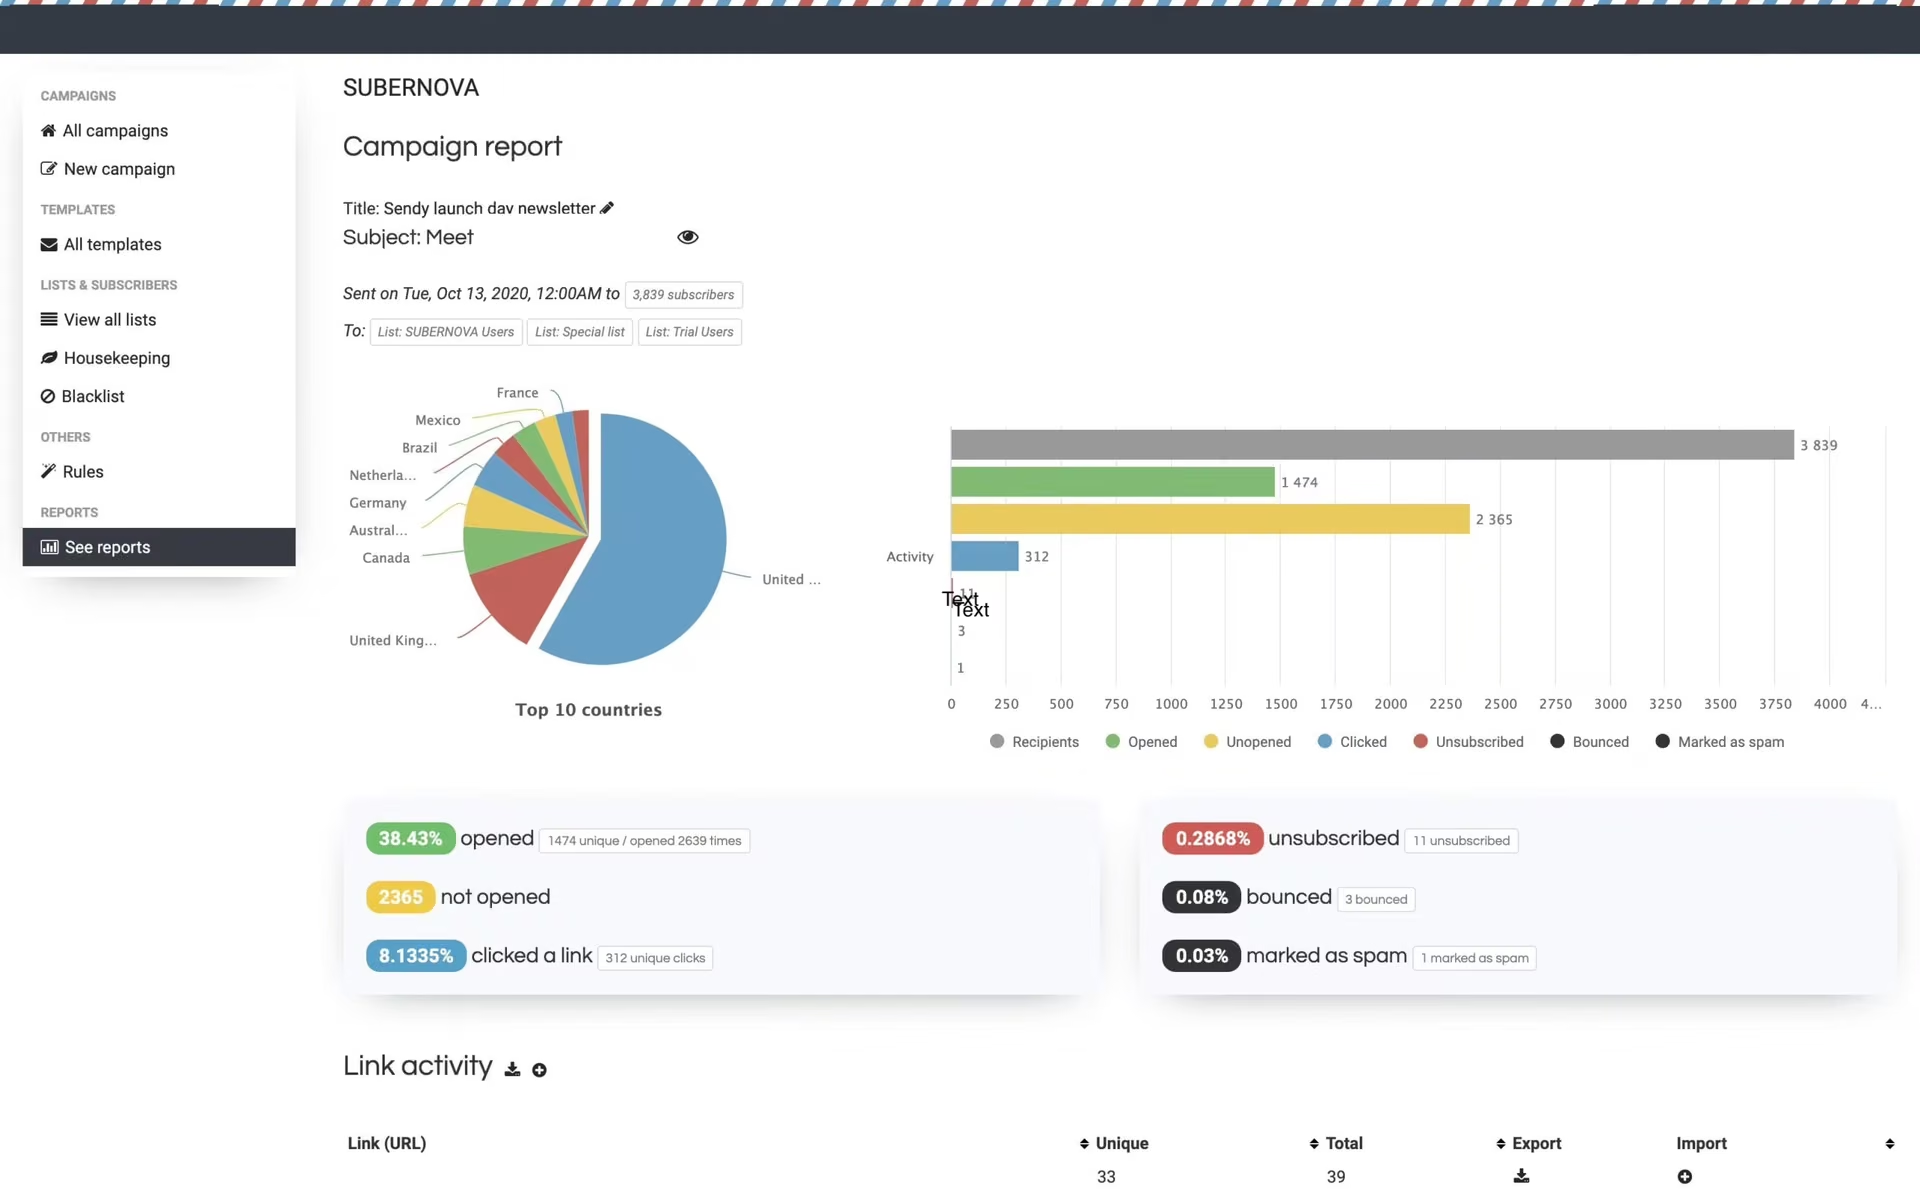
After sending, open the campaign for:
- Opens — unique and total (tracking pixel)
- Clicks — per-link breakdown
- Bounces — hard vs soft
- Complaints — spam reports
- Unsubscribes — who opted out from this send
- Export — download opens/clicks as CSV
Tip: Apple Mail Privacy Protection inflates open rates. Treat clicks and conversions as more reliable engagement signals. Use the AI Assistant on report screens for a plain-language summary of performance.
12. Bounces, complaints & housekeeping
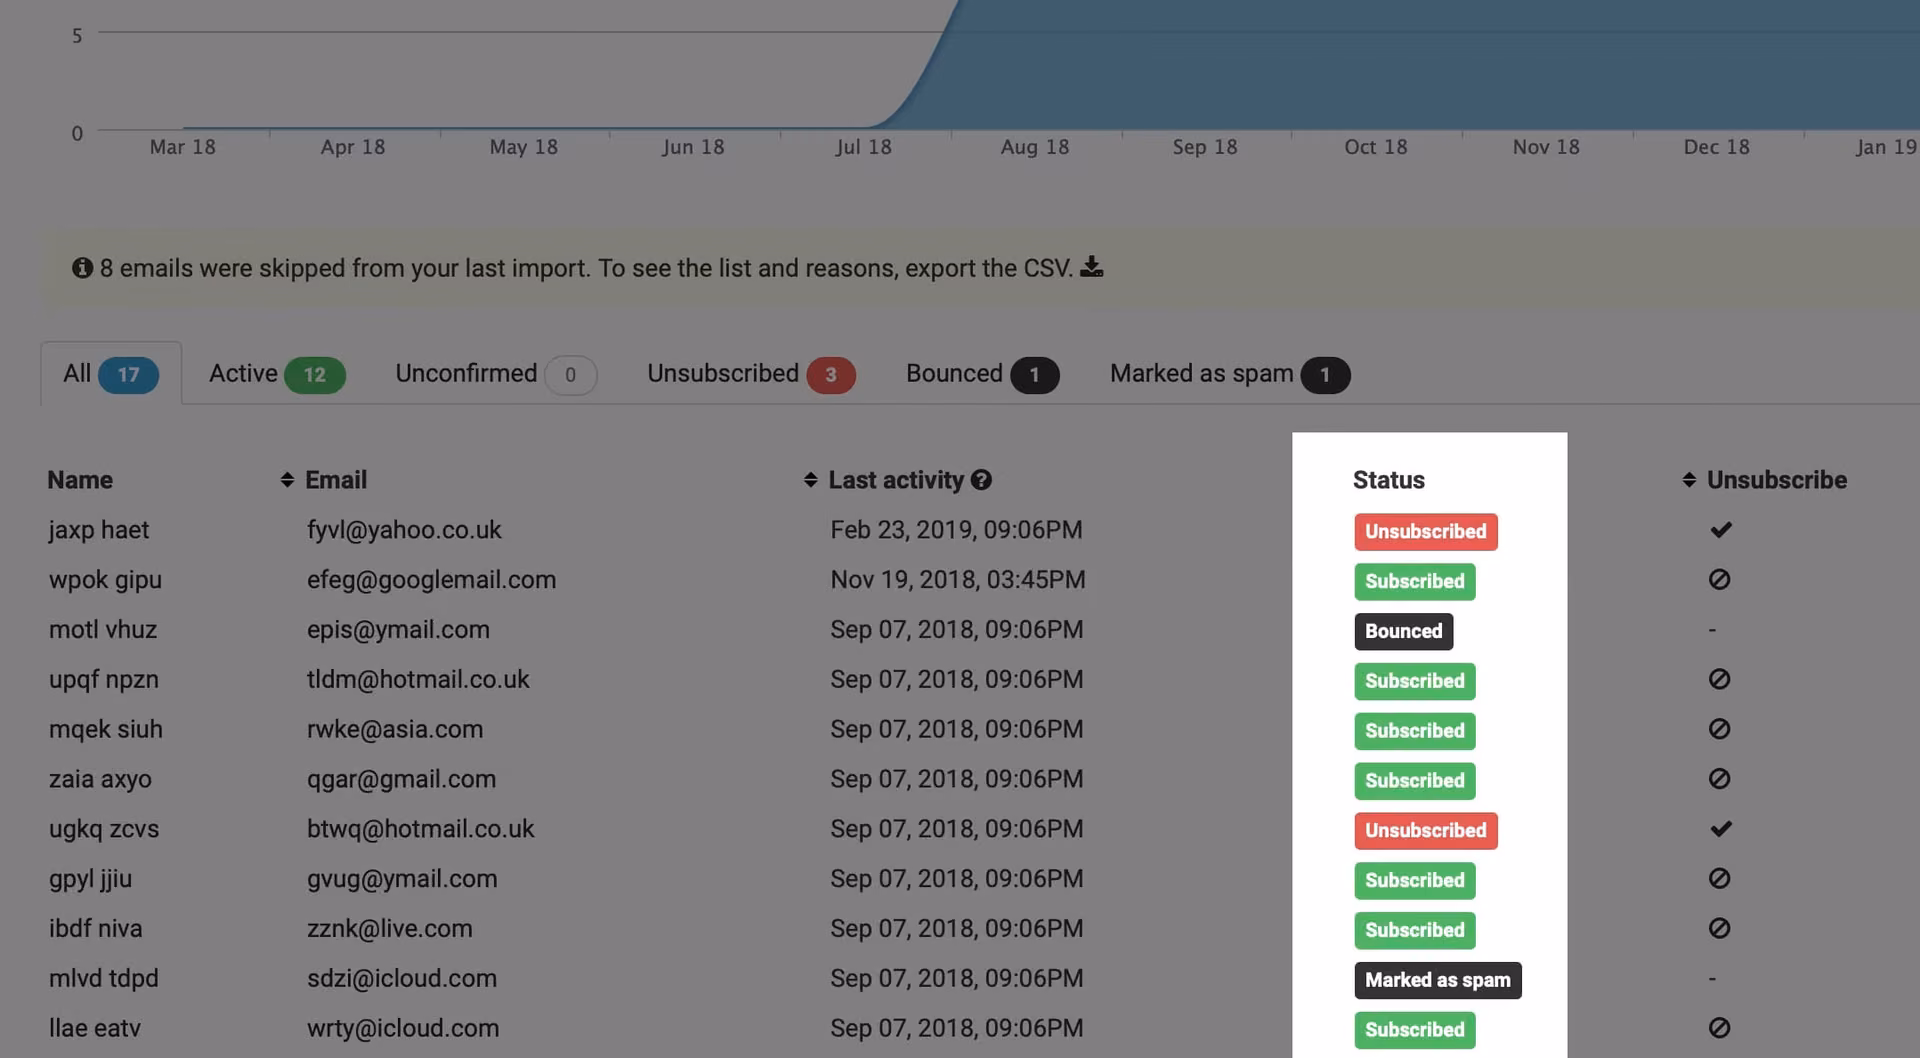
Sendit! handles bounces and spam complaints automatically via Amazon SES:
- Hard bounces — invalid address; subscriber marked bounced and won’t receive future mail
- Soft bounces — temporary failure (mailbox full); retried, then suppressed if persistent
- Complaints — recipient marked as spam; address suppressed immediately
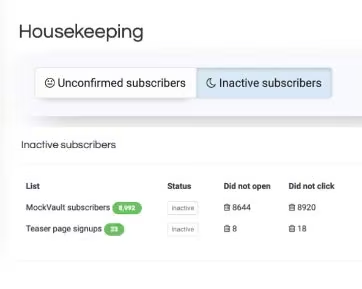
Housekeeping tools help you clean lists — remove inactive subscribers, bulk delete bounced addresses, etc. Clean lists improve deliverability and save quota.
13. Rules & webhooks
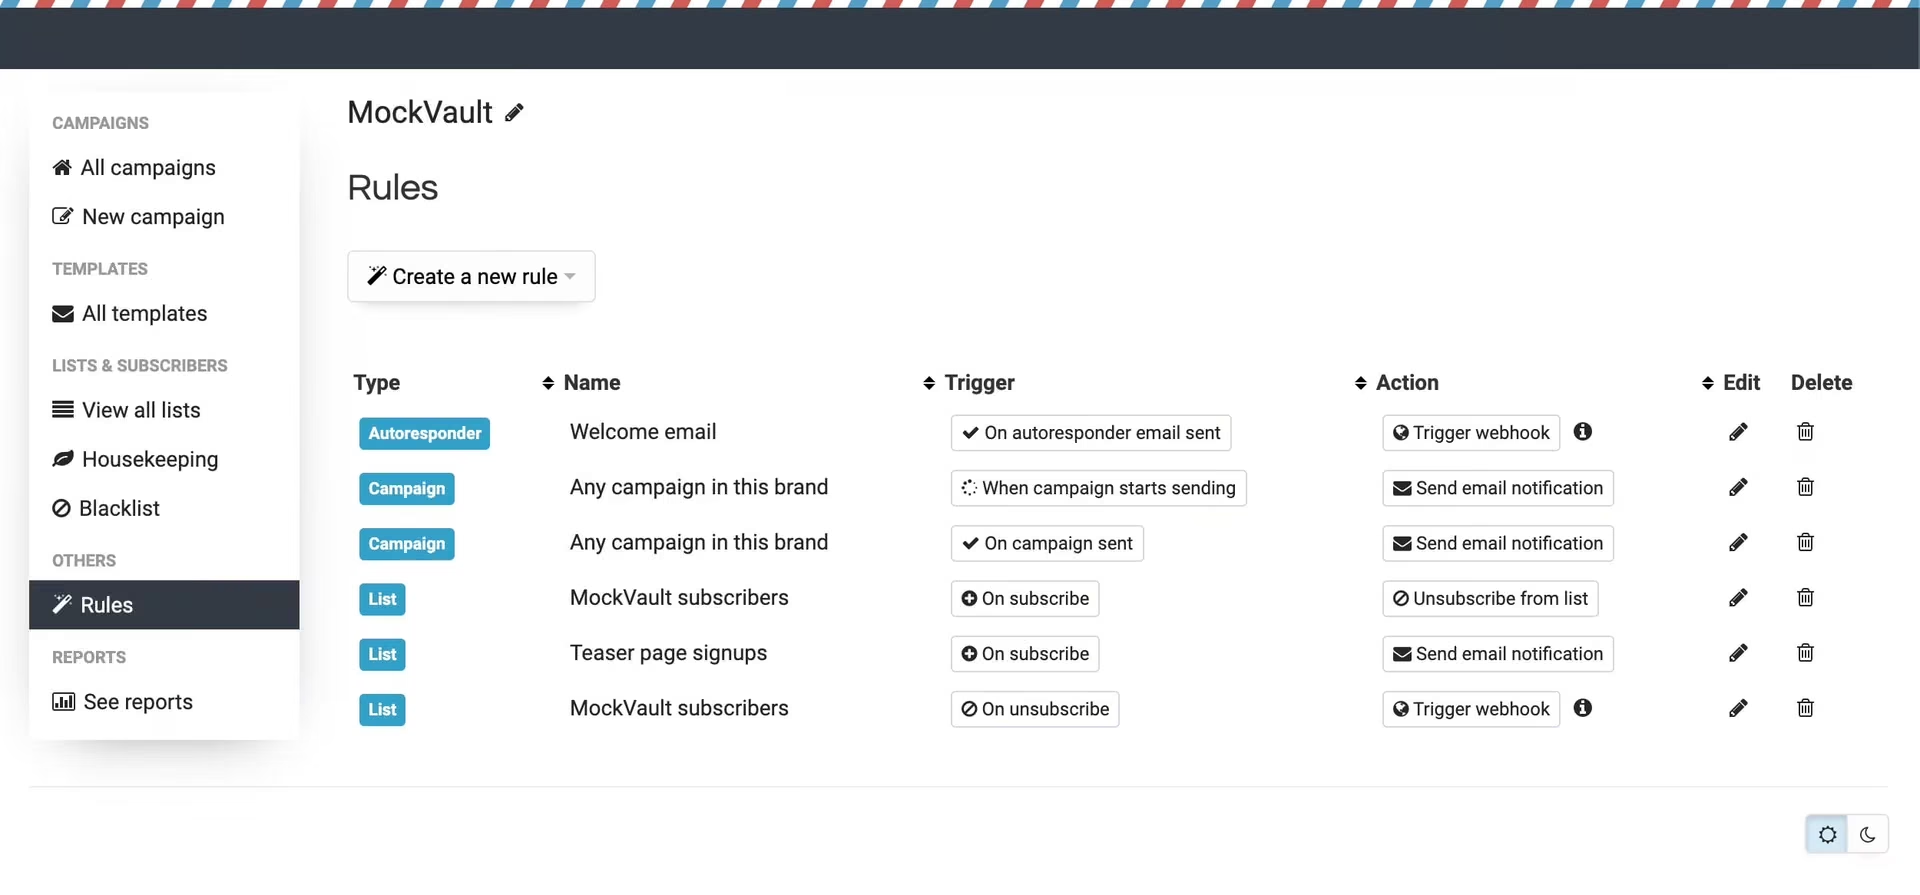
Rules automate actions when events occur:
- Subscriber joins list A → copy to list B
- Subscriber unsubscribes → notify your CRM via webhook
- Custom field updated → trigger external script
Webhooks POST JSON to your URL on subscribe, unsubscribe, campaign sent, etc.
14. Deliverability best practices
- Permission only — opted-in subscribers; never purchased lists
- Consistent From address — use a domain you control with SPF/DKIM configured
- Plain text + HTML — both versions in every campaign
- Unsubscribe link — must work; don’t hide it
- Subject lines — honest, not deceptive; avoid ALL CAPS and spammy words
- Send regularly — erratic huge blasts after silence can trigger filters
- Monitor bounces & complaints — remove bad addresses promptly
- Warm up new domains — start with smaller sends to engaged subscribers, then scale
- Attachments — large attachments increase data transfer; see terms on attachment data charges
15. Plans, quotas & attachments
| Plan | Monthly send quota | Price (indicative) |
|---|---|---|
| Small | 10 000 emails | R90 / month |
| Medium | 25 000 emails | R170 / month |
| Large | 50 000 emails | R315 / month |
All plans include unlimited subscribers, lists and campaigns. Quota resets monthly. Need more volume? Upgrade your plan in the Client Area or contact us.
Per our Terms & Conditions, Sendit! pricing excludes data charges for heavy attachments — very large attachments may incur additional fees.
Further reading
Submit a ticket for Texo-specific support.